Using HubSpot Local Development
You’ve worked in HubSpot’s CMS for a while and are no doubt comfortable developing for the platform, but maybe it hasn’t been quite the way you want it. Wouldn’t it be great to use that text editor that you’ve used for years… the one with the preferences set just the way you like them? And wouldn’t being able to roll back to a previous iteration of your work feel a lot safer in case you made a mess of things? Get ready for HubSpot Local Development.
HubSpot recently announced Local Development Tooling as a beta release that enables you to do all the development work you did before, but now easily integrating your preferred tools, including text editors, version control, and any web development technology. This means you can create using a workflow that makes sense for you. All HubSpot assets are structured in a traditional web development project of files: HTML, CSS, JavaScript, HubSpot DnD templates and modules.
Advantages of local CMS development
Use the tools you prefer to use.
Although the tools incorporated with HubSpot CMS development are good, inevitably you’ll want to pull in something you use for other projects, whether that’s a text editor, version control, or a testing framework. Now you can and with minimal effort.
Incorporate version control locally into your project
If you regularly depend on Git (or another version control system) to keep track of changes and get you out of trouble when you break things, you can now incorporate it into your project locally. Push up changes and pull down any version of your work just like any other version controlled software project.
Use any web technology
Currently, the HubSpot design tools support Bootstrap 2 and jQuery as their defaults. This previous meant being limited to using these frameworks. Now you can bring in nearly any library or framework into your project, whether it’s Javascript, CSS, DnD templates, what have you.
Your code is even more reusable
The current design manager has portal specific templates and modules. This can involve rewriting a lot of code that would ideally be central and reusable. Now the local development tools allow you to reuse those templates and modules in multiple portals.
Watch your productivity go up
As you can imagine, bringing tools you’re familiar with will make your working process that much more efficient and productive. It also means not having to cobble together a complicated chain of programs to get what you want accomplished (which usually means lots of debugging at every possible point of failure). Everything can be done in one environment.
Setting it up
Let’s go through the steps to build a template using HubSpot Local Development Tools. Before doing anything, we need to install a few software dependencies, specifically node, npm, and yarn. These are pretty straightforward and should be done in order. If you’re on a Mac, you’ll be working from the command line.
Installing Node
Node.js is an open-source JavaScript runtime environment that enables you to run JavaScript outside of a browser, which is handy for local development. It can be thought of as a means for making a local JavaScript-based web server, so you have some control over the server and browser interaction. There are a variety of ways of installing it on Macs, but probably the easiest involves using Homebrew, a handy package manager. Follow the command line instructions on the Homebrew site, then simply type brew update, followed by brew install node. For Windows it’s even easier.
Note that the documentation from HubSpot says that “versions 8.9.1 or higher of Node are supported, but we recommend the long-term support (LTS) version.” If you’re building for production, you’ll want to check this out.
Installing npm
This is a very handy package manager for JavaScript libraries. Once Node is installed, you should have npm already as part of its package. You can confirm this by typing npm -v . Updates (which tend to be frequent) can be done with
npm install npm@latest -g
Installing yarn
Yarn is dependency manager to help wrangle your now growing set of libraries. For Mac, again you can use Homebrew for this: brew install yarn. Windows installation involves an installer from the Yarn website.
Installing the local development tools
Make a folder for your project. Let’s call it local-cms-dev.
Once all of the dependencies are set, type npm install -g @hubspot/cms-cli to get the local development tools. If you want to install them in your current directory, use that same command but omit the -g.
Setting Up Sample Project
Pull this repo down from Github and run the yarn install command. If you’re new to Github, these instructions should help you out.
Set up your configuration
Even for exclusively local development (ie: a website you won’t be pushing live), you’ll want to set HubSpot account access. Any time you run commands in the local tools, those tools will reference a configuration file. This should live in a higher level directory than the rest of your project files.
You have two options for setting up authorization: guided and manual. HubSpot recommends guided unless you’re knowledgeable about what you’re doing. We’ll step through those there (the manual directions live here).
Guided Configuration
Make a blank yaml file called hubspot.config.yaml in the root folder of the downloaded repo.
Type hs init in the directory where your config file resides. Follow the prompts to set your configuration. When asked for an authentication method, you can choose either via an API key or OAuth. Either are fine, but OAuth is considered more secure. We’ll cover OAuth here and you can find information on authorizing with an API key here.
Authenticating via OAuth2
Before setting up OAuth2 authentication, you’ll need to create a private developer app. If you haven’t already, set up a developer account. Follow the instructions here and make sure you select content scope and have all marketing permissions in your account with the CMS.
Enter your CMS Hub ID at the prompt. Information on finding it is here. You should have a client ID and client secret from your private developer app. Enter these in the authorization request window of your browser. Then select your account with the CMS on the authorization page. Select “Grant Access”. If all has gone according to play, you should see “Authorization Succeeded” and your config file will be updated.
Access”. If all has gone according to play, you should see “Authorization Succeeded” and your config file will be updated.
Modify the Config File
You’ll want to rename your portal from the default name in the YAML file. Under the portals collection, look for a field labeled name: . Change the entry to whatever you want to call it.
You can also modify the source and destination for watch and fetch commands in packpage.json file under scripts: , you’ll find something like:
"watch": "npx hs watch <source> {: .blog-description}destination>",
"fetch": "npx hs fetch <source> <destination>",
Change this to whatever makes sense for your workflow.
Running the Project
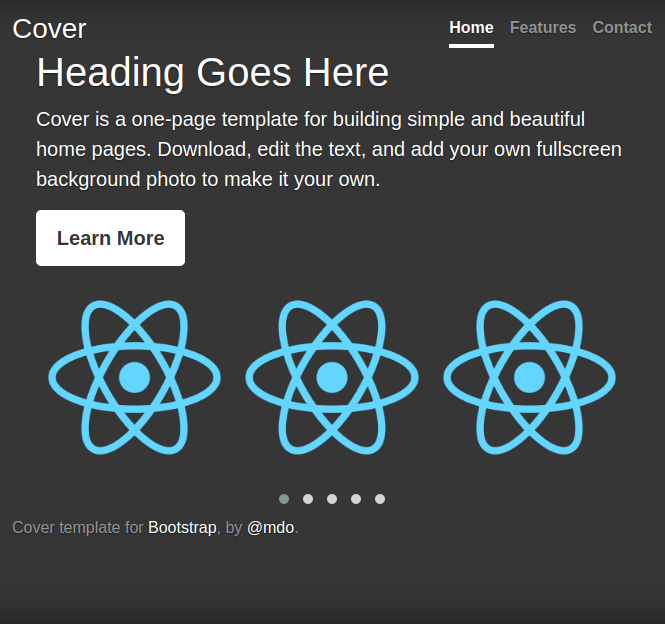
After that set up, run yarn watch command. You can preview the changes in HubSpot, similar to what’s shown below:
Running yarn fetch will retrieve the latest code from HubSpot.
Next Steps
Once you’re up and running, if you want to upgrade your version of the local tools, just type npm install -g @hubspot/cms-cli@latest Also of note is that you can use Local Development Tooling to create HubSpot modules locally. They are created in a .module directory which contains all the necessary files. There are extensive reference materials for developing modules locally, including commands and the format of their file structure.
A complete list of commands, procedures for setting up, and understanding command arguments is in the Local Development Tooling Reference. As these tools are still considered beta, note that the information listed here may change with time, so your mileage may vary. Your best source for up to date information is that documentation and notifications from HubSpot for any updates.
HubSpot has requested that any feedback on the project go directly to their Developer Community Slack, specifically the #local-dev-beta channel. They’ve also said that the Local Development Tooling will eventually be open sourced, suggesting it has a long and fruitful life ahead of it.
The HubSpot CMS was already a powerful platform for development. Now the sky’s the limit as far as what you can bring to it.

.png?width=343&height=334&name=Frame%20(3).png)
.png?width=343&height=479&name=Frame%20(4).png)

 9 min read


.png?width=204&height=62&name=Frame%20(13).png)
.png?width=204&height=62&name=Frame%20(18).png)
.png?width=204&height=62&name=Frame%20(11).png)
.png?width=204&height=62&name=Frame%20(12).png)
.png?width=204&height=62&name=Frame%20(15).png)
.png?width=204&height=62&name=Frame%20(16).png)
.png?width=204&height=62&name=Frame%20(17).png)
.png?width=194&height=62&name=Frame%20(20).png)