At HubBase, we chose to focus on HubSpot CMS after years of working with various content management systems. There’s a reason for that: HubSpot CMS is secure, reliable, and fully customizable from both design and technical perspectives.
For example, with custom API integrations, you can integrate HubSpot CMS with any app and work seamlessly with your entire tech stack.
A decade of experience building websites in HubSpot CMS inspired this list of steps needed to migrate a website to HubSpot.
1. Migrating to HubSpot from WordPress, Webflow, and other platforms
The migration process is the same whether you're moving from WordPress, Webflow, or another CMS. What matters is that you chose to migrate to a platform that will allow your business to scale. So well done, you.
HubSpot CMS comes with a free CRM, which enables you to manage content, leads, and contacts, all while offering advanced analytics. You can use CRM data to create personalized online experiences for every visitor to your website and optimize pages for conversions, essentially turning your website into a business growth engine.
Additionally, your marketing team can easily create landing pages and publish content if you take care to develop your website with HubSpot CMS best practices in mind.
2. What are the options for migrating the website to HubSpot CMS?
There are several options available for migrating websites to HubSpot:
a. CMS migration by the HubSpot team
Review your HubSpot agreement with a HubSpot sales rep to see if your website qualifies for the migration service.
You may be eligible for website migration if you subscribe to HubSpot CMS Professional or Enterprise.
Professional or Enterprise Marketing Hub subscribers may be eligible to have their blogs migrated by HubSpot.
Note that HubSpot does not migrate websites with dynamic functionality or complex design. HubSpot will migrate simple websites as-is, without modifications or additions to your existing design.
If you find that your website is not eligible for migration by the HubSpot team — feel free to reach out to us. Our team has supported hundreds of clients with HubSpot CMS migrations. We’ll gladly provide you with a free migration quote.
b. CMS migration by a HubSpot partner agency
This option allows for more control and customization. An experienced partner can redesign your website, build a custom HubSpot theme based on your AdobeXD, Figma, or InVision mockup, or modify a pre-built theme to match your brand guidelines.
HubSpot CMS developers can also create database-driven pages, integrate ecommerce functionality, build calculators and other widgets, and add login options, mega menus, and other advanced functionality.
If this sounds like the route you want to take, connect with us or check out our guide on how to hire a HubSpot developer.
c. Migrate your website in-house
Have in-house designers and developers? Work with your team to migrate the website.
If your web developers are new to HubSpot CMS, encourage them to take a free HubSpot CMS Development course. There is a learning curve, but if they are familiar with HTML, CSS, and JavaScript, HubSpot's HubL won't take long to master.
3. Before migrating to HubSpot CMS
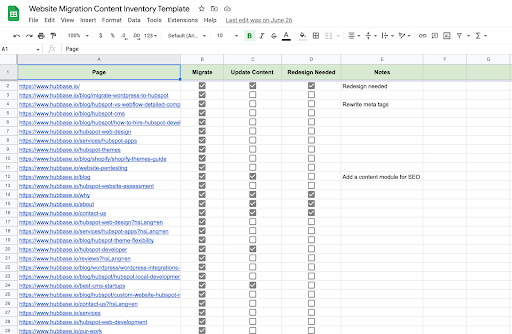
a. Perform a content inventory
You may have a sitemap, and the number of pages on your website may seem obvious. But our clients are often surprised when they discover numerous pages they were unaware of during the pre-migration content inventory.
Here’s how to start with your content inventory:
Generate a sitemap with a tool like XML Sitemaps. You can then convert an XML sitemap to a CVS format and import it to a spreadsheet like this one:
Website Migration Content Inventory Template
b. Utilize content-first design
Although you could swap out your content after the website migration, some content updates may lead to additional design and web dev updates.
If you’re planning a redesign or a design refresh, prepare your content first.
Why? Because you know your business like no one else. Get the content ready first, then have the design team do their work. The alternative is having a designer guess what your page design should look like. This could lead to:
- A mismatch between the designed templates and the final content
- More revision rounds that result in delayed website launch
Content-first design allows for a faster website migration and creates a better user experience. Give it serious consideration before embarking on the redesign.
c. Always keep SEO in mind
With time, web pages can acquire SEO equity. The pages you may be planning to remove as a part of your website migration may actually be working hard for you.
The following two items should be on your SEO pre-migration checklist:
1. Look at your Google Analytics (or your go-to web analytics tool). Sometimes, the content you plan to leave out during the migration may be driving traffic to your website.
2. Check Google Search Console (or your SEO tool of choice) to see if other websites are linking to the pages on your removal list. Inbound links (or backlinks) are one of the core aspects of your website’s SEO success. Keep them.
If you identify that the pages on your removal list hold SEO value, allow these pages to continue to bring traffic to your website. Update the content instead of removing these pages and keep them around.
4. Choose a HubSpot theme
Themes are a collection of modules, templates, style settings, and content that can be customized to create a website. With HubSpot themes, you can customize each template using a centralized admin panel. In many cases, creators can implement updates without having to engage a HubSpot developer.
When it comes to HubSpot themes, you have two options. You can:
a. Purchase a theme from the HubSpot Marketplace
You can purchase themes via the HubSpot Marketplace, which offers free and paid theme options.
Customizing a pre-built theme is a solid option if you do not have complex design requirements. It’s also the least expensive of the two options.
b. Build a custom HubSpot theme
If you have complex brand design guidelines and a larger budget, build a custom HubSpot theme. Custom themes allow for more control over your design.
Connect with our team, and we’ll be happy to discuss both options with you.
5. Set Up HubSpot content staging
A content staging environment (aka testing site, development site, or the sandbox) is a private copy of your HubSpot website.
This staging environment enables you to implement and test changes without affecting your live website.
Content staging environment is included with every HubSpot CMS Hub. Within content staging, you can create new pages or update existing ones
Check out our article on why you should leverage HubSpot content staging environment during the migration.
6. Taking your HubSpot website live
Using the HubSpot content staging environment mentioned in the previous chapter, here’s how to take your website live:
a. Connect your website domain with your HubSpot account. This requires a good understanding of how DNS works. Let a HubSpot partner take care of connecting your website domain to avoid any problems or outages. If your website domain is already connected, please skip to step b.
b. Ensure the correct domain is selected for every staging page in the page ‘Settings’ tab.

c. You can publish your staged pages by following these steps:
- Go to Marketing > Website > Website Pages in your HubSpot account
- Select “Content staging” from the “More tools” dropdown menu in the left sidebar panel.
- At the top left of the content staging tool, click “Publish.” Then click “Publish all to live domain” in the upper right to publish all staged pages for a domain. Note that if you are not publishing the entire website, check out this HubSpot knowledgebase article for more information.
- Enter the “Publish job name” in the dialog box as well as the “Publish job description” and click “Next.”
- Review the details:
Add X site/landing pages
This number indicates the new pages that you will add to your website.
Replace X site/landing page
The staged versions of the live pages will replace the live pages, deleting them.
Note that although this option will delete the original site content currently live, you have the option of restoring it via the Revision History.
- Click “Publish” after selecting the “I’ve reviewed these changes and am ready to publish” checkbox.
7. Post-launch checklist
Work closely with your web development, design, marketing, and other teams to check the newly published website for:
a. UI consistency
b. Lead-capturing forms functionality
c. Main navigation, widgets, and on-page buttons and links d. Activated TLS (aka SSL) certificate
e. HubSpot integrations functionality
f. Mobile responsiveness
g. Website security with pentesting
h. Website loading speed
I. Accessibility
Verify that:
j. Your Google Analytics is working properly
k. You have submitted your updated sitemap to Google Search Console
l. You have requested website reindexing in Google Search Console
Need a partner to guide you through the entire website migration process? Schedule your free consultation.


.png?width=343&height=334&name=Frame%20(3).png)
.png?width=343&height=479&name=Frame%20(4).png)

 5 min read


.png?width=204&height=62&name=Frame%20(13).png)
.png?width=204&height=62&name=Frame%20(18).png)
.png?width=204&height=62&name=Frame%20(11).png)
.png?width=204&height=62&name=Frame%20(12).png)
.png?width=204&height=62&name=Frame%20(15).png)
.png?width=204&height=62&name=Frame%20(16).png)
.png?width=204&height=62&name=Frame%20(17).png)
.png?width=194&height=62&name=Frame%20(20).png)